Pages

Craft Room Organization- Part 2: Hanging Buckets!

Monday, September 7, 2015

After we completed our recent Picture Ledges project, I was feeling like my craft room table was looking cluttered...and I don't like clutter.

Brett actually suggested using small buckets to organize the tabletop items, which I loved! But I wanted the stuff off the table... ah HA! Hang 'em on the wall!

Thankfully, we always have scrap wood from previous projects lying around. So I didn't have to go to the store for the lumber!

To build your own 3-bucket holder, you'll need:
  • 1 x 2 piece of wood (I prefer primed wood.. it's easier to paint!)
  • 3 small screw-in hooks
  • Drill with bits
  • Paint
  • 3 small buckets


Photo Credit: Target.com
I was able to find the screw-in hooks on a recent trip to Target and I found the small buckets at Michael's. Of course, I used my weekly Michael's coupon for some awesome savings!

Since we had some wood lying around, I chose to use a primed piece of 1 X 2 for this project. Brett then cut the wood to our desired length; 18-inches.  If you don't have a saw at home to cut your boards to the desired length, the friendly people at Home Depot/Lowes are usually willing to cut it for you!

I then sanded and painted the boards with a couple coats of semi-gloss white paint. I used the buckets to guide where I should drill the holes for the hooks. I knew I wanted the first hook to be directly in the middle (9 in. from the end of the board). I then decided I wanted the other two to hang 6 inches from that center hole. Here's a diagram:

Just drill holes in these spots (the box of hooks will tell you which size drill bit to use), and screw in the hooks!

To hang on the wall, either attach a picture hanger, screw/nail directly into the wall or use command hooks...whichever you prefer!

Craft Room Organization- Part 1: Picture Ledges

I have participated in quite a few "Sip and Paint" classes in the past few years. Which means I have quite a few canvases lying around my craft room. I decided a few weeks ago that they need to be properly displayed, but I didn't want to just hang them on the wall. What to do? Picture Ledges! Problem was... I wanted long ledges (6 ft) but I couldn't find them anywhere!


Corner Moulding
Picture Credit: Lowes.com
So, Brett and I took a trip to Lowes and started thinking of how we could make these ourselves. After wandering around the lumber department we determined we would need the following:
  • 2 x 4 Poplar Board
  • Corner Moulding
  • L Brackets
  • Paint
  • Sheet Rock Anchors
We first cut the 2x4 and corner moulding to 6 ft. sections. Then we stripped the 2x4 in half, length-wise using a table saw. Since the ledges won't need to support much weight, I wanted them to be thin and sleek.

Next, we glued the board and corner molding together using wood glue. We then used a brad nailer to ensure that the 2 pieces would stay together. The glue is quite strong, but the brad nails provided some "insurance"... and gave Brett a reason to use his new tool, very important.

To fill in the small brad nail holes, I used some putty leftover from a previous project. After the puddy dried, I used some fine grit sandpaper to smooth everything and remove the excess.

Lastly, we gave the ledges a couple coats of semi-glass white paint. After they were dry, we attached 3 of the L brackets to each shelf as shown in the picture below:


Since these brackets didn't perfectly line up with the studs in the walls, we had to use sheetrock anchors. These are simple to use and ensures the nails/screws won't pull out of the sheetrock.

We carefully arranged our MAGNIFICENT works of art on the ledges and WAH-LA... we're done. As an added bonus, these 2- 6ft. ledges cost us about $30! LOVE IT!


Coca-Cola Cake

Thursday, May 14, 2015

It's been awhile, but I'm still here! I haven't had much free time to dedicate to my craft projects, but fortunately, I have had time to cook!

My mom instigated weekly family dinners earlier this year and I am quite fond of these dinners for a few reasons:

1. I get to see my family at least once a week
2. We rotate houses each week, so the responsibility is never on one person
3. On my "off" weeks, I get an extra day off from cooking dinner.... #winning

This was my week to host dinner, so I started searching my Pinterest "food & drink" board for inspiration. I came across a delicious rosemary lemon chicken recipe and knew this would be the dish of the week. Why, you might ask? Well, its easy, fast and YUMMY! Here's the recipe if you're interested: Rosemary Lemon Chicken.

I don't consider myself much of a cook, but I do love to bake! Basically, dessert is my favorite part of a meal. Is it an addiction? Yes, yes it is. So in the spirit of sharing all things delicious with you, here's the recipe.Coca-Cola Cake.

Photo Credit: Mayflaum.com
How could you resist that delicious looking cake? I know I can't.. and didn't! The only change I made to the cake recipe was omitting pecans from the glaze/topping. I knew I would have leftovers of this cake and would like share with my work bestie, Emily. Sadly, Emily is allergic to pecans. I know.. I know, its tragic...but the cake was just as good without those nuts!

Needless to say...the cake (and chicken) got rave reviews. You should certainly try both of these recipes... I promise you won't be disappointed!

Hopefully, I will have some free time in the upcoming days to complete my in-progress crafts/DIY projects. As soon as I do... I'll be sure to post them!!

<3 Brandy

Canvas art

Thursday, April 23, 2015

Have you ever stumbled across a painting or sign online and thought, "I could totally make that!" Well, I know I have. Often, the paintings, pictures or signs that I find are SUPER cute but too pricey for my budget.

I have based my home purchases around the idea to spend where it counts. Basically, I splurge on the furniture and save on the smaller décor items. I can totally justify paying a higher price for an intricate piece of art, but a simple sign? I don't think so. Paying $40 for a sign I can easily make myself for less than $10...no ma'am.

Michael's runs "super buys" on wrapped canvases a few times a year. I like to take advantage of these savings, as I'm sure I'll come up with a way to use them in the future. Recently, I noticed my guest bathroom was looking a little bare. I'd like to make my guests feel welcome and hopefully make them smile....with a humorous bathroom sign. So, I dug out a canvas and some paint and got to work.

To conserve paint, I like to mix a gel medium with my acrylic. I've had good experiences with this brand:

I first painted my base layer, then hand sketched the words I wanted on the canvas. I didn't want it to be "perfect" but I did use a ruler as a guide. After writing, erasing, writing and erasing some more... I was ready to paint. End Result:

As I mentioned in my first blog post, I'm obsessed with Christmas. I MAY or may not be listening to Christmas music as I type (don't judge me). So, naturally... I used some canvas art to jazz up my Christmas decorations this year as well:

Is it Christmas yet?!


Another way I like to use canvases is to make DIY canvas photos. Here's some that I made for my kitchen & hallway:
Breakfast Area Canvas Prints
Hallway Canvas Prints

These are easy to make and WAY cheaper than buying the "real thing." I know the actual canvas prints look amazing, but these aren't too far off. (In my humble opinion) To make these, you will need:
  • Canvas
  • Photo Print (same size as canvas)
  • Scissors
  • Sand Paper
  • Acrylic Paint
  • Mod Podge
  • Foam Brush
Ok, got everything together? good..let's go!

Step 1: Lay your picture on top of the canvas to see if it hangs over the edge(s). If it does, trim off the excess so the picture will lie right on the edge of the canvas.

Step 2: Paint the sides of your canvas desired color (I used dark down for my kitchen and black for the hallway pictures)

Step 3: Apply a layer of mod podge to the entire canvas.

Step 4: Lie your photo on the canvas (on top of the modge podge) and press down to adhere the photo to the canvas. Make sure your edges line up!
TIP: Once I have the picture pressed down, I flip the canvas over (so the picture is face down) and firmly press on the back of the canvas to make sure I get rid of all the air bubbles!

Step 5: Wait for the mod podge to dry (I know.. I know... this is a lot to ask!)

Step 6: Use sandpaper to remove any rough edges from your photo.

Step 7: Apply another layer of mod podge on top of the photo and all edges of the canvas.

Step 8: Wait for the mod podge to dry (I know what you're thinking...again?! I have to wait?! YES, yes you do.)

Step 9: Apply a 2nd layer of mod podge to the entire canvas/photo.

Step 10: Let dry and you're done!

Side view
I hope you enjoy using these ideas to create your own home décor!

<3 Brandy

Indoor Mini-Garden

Sunday, April 19, 2015

Our kitchen island is home to holiday decorations in some months, and fresh flowers when we actually have them. Otherwise, the island is empty and sad. This had to change!

My green thumb is what I would call a "work-in-progress" and certainly has not been successful with indoor plants. Since I love miniature things, I was attracted to the succulent area at my local nursery. I started reading about succulents and learned that they are easy and low-maintenance. This sounds like my kind of plant!

"Totes adorbs"


I read about how to plant and care for these adorable little plants, and made the decision that these NEED to live in my kitchen. The one pictured on the back left is called "jellybean," obviously I couldn't resist. I mean... a miniature garden...right in my kitchen.. YESSSS!

I went ahead and picked up some succulents during my last nursery trip (while working on THIS project). This was my way of 1/2 way committing to the project, considering I didn't have all the supplies. So, I finally decided to make it happen and purchased a glass bowl at Michael's, then headed to the pet store for the remaining supplies. Now I know this sounds odd, but the articles I read said to use activated carbon in the bottom of succulent containers. Supposedly, this will help clean the water and prevent mold/mildew. I'm not sure if you can buy this stuff anywhere else, but I knew the pet store had it in the fish department. If this is what the experts say.. I'm doing it! Additionally, the "experts" say that succulents like well drained soil. Therefore, you should have a layer of rocks in the bottom of the container with soil on top. To avoid going to more stores, I purchased some aquarium rocks as they were the size I felt looked best in my chosen container.

Side note: I was at the pet supply store anyways... obviously, Toby NEEDED a new toy. He is my child, and he is spoiled. Rotten... anddd I'm ok with that. Moving on....
Shameless photo of Toby...because I can.

Here's all the supplies you'll need to make your own mini succulent garden:
Pebbles/Rocks, Activated Carbon, Potting Soil, Container & Succulents

Start with a layer of carbon, then add your rocks/pebbles.Next, add a generous layer of potting soil.

I arranged the succulents as I felt looked best, then planted. I topped the whole container with another layer of rocks, just for aesthetic purposes. Wah-Lah, DONE:


I'm hoping the articles I read will prove to be true and my little garden will flourish! If not, Toby looks cute year round and I suppose I can just sit him on the island.

<3 Brandy


You can call me a flower if you want to, I don't mind....

Sunday, April 12, 2015

Spring has officially sprung in Georgia! We were blessed with 70+ degree weather and abundant sunshine this weekend, and I was ready to get outside! Our yard is (thankfully) turning green...slowly, but surely.... but it still needed some more color. You know where I'm going with this..... FLOWERS!

We recently purchased a new planter for our back porch after last year's planter met a terrible demise in the February ice storm.....R.I.P. little planter. I was pretty stoked about this planter and started looking for some flower inspiration on Pinterest. I fell in love with some Mexican Feather Grass, but to my displeasure, I found that neither Lowes, Home Depot or Pike carries this beauty. Booo!

This setback didn't deter me from my mission. I knew there would be plenty of other gorgeous flowers. So, I set out on my flower shopping adventure and came home with some loot:


While selecting flowers for my planter I kept 3 words in mind: Filler, Spiller and Thriller. This is a common concept that people use to design planters. In short, you need flowers to Fill, some to "Spill" over and some to "Thrill" (aka: tall, flashy, etc). Why did I just start singing Michael Jackson? ok ok, moving on..

I partially filled my planter with potting soil and then started arranging the flowers. After deciding the layout, I added more potting soil to complete the process.


A few tips:
  • When pulling flowers out of their plastic containers, squeeze the pot to loosen the soil and the plant will come out easier.
  • Make sure to break up the soil/roots before planting your new flowers. Basically, don't just pull that sucker out of its old house and stick it in a new one. It needs a little massaging to make its new home feel cozy.
  • If your planter does not have a hole in the bottom, make sure to drill one to ensure proper water drainage.


After completing the planter for the back porch, I realized that there's enough space between our 2 garage doors for another planter. So.. ya, I went back to the store for more. GUILTY!

Same process, different planter. I'm not sure which one I love more, but I do love all the colors. I can't wait to see them grow, because in this case, BIGGER is BETTER!
 
<3 Brandy


Timothy the Turkey

Wednesday, April 1, 2015

Meet Timothy.

Timothy the Turkey

Timothy was proudly harvested in 2013 by none other than my boyfriend, Brett. Since taking a short trip to the talkative taxidermist (seriously though, she talks A LOT), Timothy has lived in Brett's man cave.

His days haven't been completely lonely, as he has been proudly displayed with other wildlife. Unfortunately, this display was quite sad. Just kind of blah...needed a little jazzing up!
Ho Hum, How Boring....


While wasting time browsing Pinterest a few weeks ago, I stumbled across this gem:

Picture Credit: Pinterest via Indulgy.com/ designmom.com


I love it and I have to have it. Naturally, I clicked the pin to get more information and follow the link....only to find a dead end. Really Pinterest? Really.... you're gunna do me like this. So after digging all over the internet, I finally found the original picture. SUCCESS! I start reading the post and find out ..OH, surprise, surprise... this picture is from one of Joanna Gaines past homes. She may or may not be my style soul mate. I'm just saying, if my style had a spirit animal, it'd be her.

The article was an interview/home tour, not the "how to" article I was expecting. BUT this didn't stop me. Afterall, I have Brett and all his super handyman skills.

So off to Home Depot we went to search for some beautiful cedar boards. I thought that we would get some 1x6 boards, but ended up purchasing some rough cut 2x6's. This allowed us to save some money by cutting down the boards ourselves. Also, the boards were better looking, in my humble opinion.
Gimme!
Don't let the SUPER bright lights trick you, these boards are  a gorgeous red color.
Once at home, we ripped down the boards to 1x6 with a table saw. Next, we randomly cut the boards to various sizes to get the "imperfect" effect. I laid all the boards out on the ground to decide how I wanted them to hang on the wall. Once I changed my mind ummm 5 times, we had a plan.

After hauling all those boards upstairs, we used a stud finder to locate the studs to ensure these beautiful babies don't fall off the wall. Once we had that marked, we started screwing the boards up on the wall, using a level to ensure they were relatively straight. We used some gold-toned finish screws (aka; small heads) so they would blend well with the boards.

Here's how it looked once we had a few rows complete:


We "kept on keepin' on" until all the boards were hung. Overall, it took us a couple hours to hang all the boards. Lastly, we hung the deer, fish, antlers and other items to complete the look. 

Drum roll please....


Brett's first bow :)


I am quite happy with the results. I'm still trying to determine if Timothy should have a "perch" of sorts...decisions, decisions. Either way, Timothy's place has certainly got a face lift.


One fish, two fish, RED FISH....

Tuesday, March 31, 2015

Last summer, we went on a deep sea fishing charter to catch red snapper. I was a bit nervous at first, as this would be my first experience deep sea fishing at night! Thankfully, Jaws did not attack our boat and no one fell overboard into the dark water....whew! If you're looking for a good charter service out of Mexico City Beach, FL, I suggest you check out Charisma Charters.
One plus to night fishing: Beautiful Sunsets!


Aside from the night fishing part, I was PUMPED to go deep sea fishing again. It's safe to say that I am extremely competitive, along with the rest of my family. I suppose you can say that I "came by it honest." So, naturally, I was talking all kinds of smack on the way out. I WAS going to catch the biggest fish of the night. I say "was" because my line broke at one point and I will forever contend that was solely because the fish was too big for the line..... it is my lie, and I will tell it as I wish, ok?

Anywho... we DID catch a lot of decent sized fish!


All-in-all, it was a great fishing trip and I enjoyed trying something new with Brett! He puts up with my competitive attitude and even helped bait my hook a few times. :)

The even better news about this trip... we have lots of fish to eat! WOOHOO! So, now its March and I still have a few pieces left. We have prepared this fish a few ways and I have yet to find one I don't like. My favorite so far is lightly marinated and topped with tropical salsa; recipe here.  YUM!

Tonight we decided to try it another way. So, I took to the always trusty www.foodtv.com and found this recipe from Paula Dean. The directions seemed simple enough and didn't include any special ingredients...winner, winner FISH dinner!

End result: good. I'd cook it again, but this grilled recipe still remains my favorite.


I have to note that I did omit the parmesan cheese. Why would someone omit delicious parmesan cheese, you might ask? Well, Brett doesn't eat cheese. You read that right. He WILLINGLY doesn't eat cheese. It's beyond me, but I'm not preparing 2 separate meals.... so I took one for the team.

I like to try new recipes, even if they don't turn out to be my new favorite dish. Wouldn't know unless we tried, now would we.


Quick Wins!

Monday, March 30, 2015

I always seem to have a project in the works, or two, or three... The good news is, I do complete them, but they often take more time than I anticipated. I often run into the issue of things taking more time than anticipated. I suppose I should better manage my expectations for projects :)

I recently heard the term "quick win" at work and it has stuck with me. Basically, a quick win is something we can accomplish right now, or in the near future. Thinking back on my recent home projects/crafts I found that a few of those were indeed quick wins. Umm can I get a #winning?!

Most recently, I was inspired by a episode of HGTV's Fixer Upper to make my own herb planter out of a chicken feeder. Sounds weird right?... well, I like weird. So I set out to to pick up a metal chicken feeder and some herbs. I bought my feeder at Tractor Supply. You can get one too, here.

Before I continue... I should mention that I LOVE a deal. I mean... its like a sweet, sweet victory. So when I saw Home Depot had herb plants 4 for $10, it made my day. Rosemary? Cilantro? Parsley? Chives? DON'T MIND IF I DO!


Ok, back to business. Here's how I made it:

First, take the metal feeder, turn it upside down and drill some holes. This will allow your soil to properly drain.


Next, fill the center and edges of the feeder with soil. Lastly, plant those little herb babies in any pattern that you desire. I plan to hang my planter, so I'm not worried about the ones on the edges hanging over.

VIOLA....all done! QUICK WIN!


<3 Brandy

Hi, I'm new here.

Thursday, March 26, 2015

I was recently told that I should consider writing...so, here I go!

First, I think I should start with some basic facts about my general interests. This will help you decide if you should continue reading or not. :) I absolutely love my family, friends, dog (Toby), crafts, DIY projects, baking, good food, and being active. These, of course, are not listed in order of importance, but you get the idea. Additionally, I have a serious obsession with Christmas and anything in miniature form. Just throwing that out there....

I have a wonderful/amazing/loving/handy boyfriend that helps me with most of my DIY projects. He is quite patient, which is a good thing considering my "go-go-go" attitude towards new ideas.

We bought our first home 1+ years ago and have tackled quite a few projects since then. I'm constantly finding inspiration for new projects, so even though the house may be near my version of "done," it seems there's always that "one more thing."

I hope you enjoy reading my random thoughts, ideas and inspirations throughout this new writing journey!

For now, here are a few before/after photos of our house and past projects.


Exterior
Back Deck

Master Bedroom

Dining Room

Garage Entry

Entryway Stairs- Light to Dark Stain

Kitchen

Kitchen Backsplash
Master Bathroom

Office

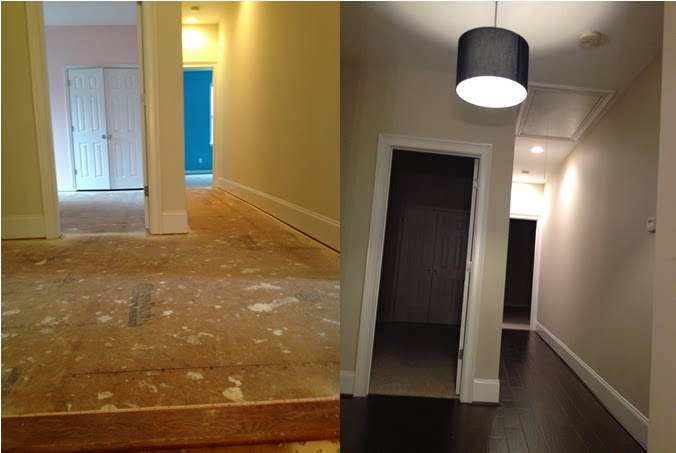
Upstairs Hallway


 P.S. I promise to take better pictures going forward!